You may have seen some of your favorite creators start a channel from their homes and grow it to millions of subscribers. It must have inspired you to start creating. You visualized how intoxicating running a successful YouTube channel will feel like. You’ll have so many fans that love you and anticipate your videos every day.
But then come the doubts and fears. What if you fail? What if your video quality sucks, and people hate you? Oh, what will even be a memorable channel name?
Don’t worry.
Based on my personal experience and going down the trenches searching for wisdom from successful YouTube creators, I’ve compiled ten tips on how to start a youtube channel. These will set up you nicely for growing your channel at an optimum speed.
Here’s the first one:
1. How to Set Up a YouTube Channel in Three Simple Steps
If you’re starting from scratch, below are the simple steps to set up a new channel:
Create a YouTube Channel From Your Google Account
All YouTube channels are connected to a Google account, so start by visiting accounts.google.com. Then, click “Create account” in the bottom left corner.
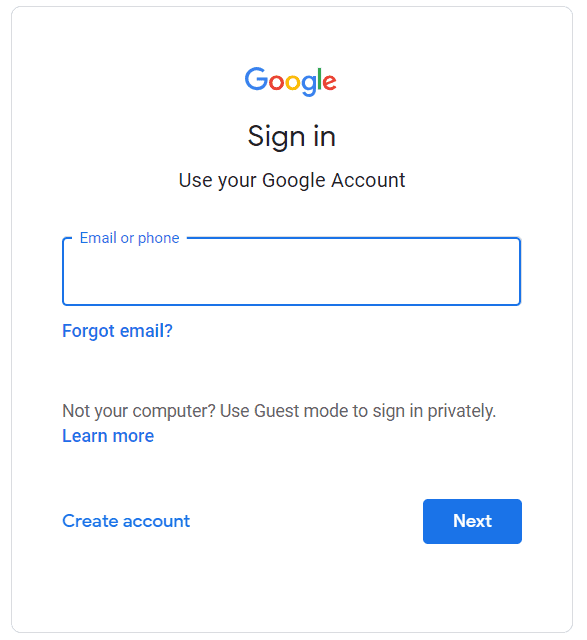
From here, Google will prompt you to provide details, such as your name and username.
After you’ve set up your account, go to YouTube.com, and tap “Sign In” in the top right corner.

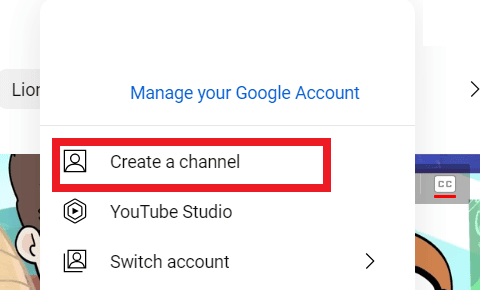
Enter your Google account login information and tap your profile icon in the top right corner. Then, click on the “Create a channel” button to launch your YouTube account.
Basic Housekeeping For Your YouTube Channel
Now that you have a new YouTube channel, take the following steps to flesh it out before uploading videos.
Verify your phone number
YouTube wants to combat spam, so it wants you to verify your phone number. In turn, it allows you to unlock some cool features such as:
- upload custom thumbnails,
- post videos longer than 15 minutes,
- appeal Content ID claims,
- and live stream.
Here’s how to verify your YouTube account:
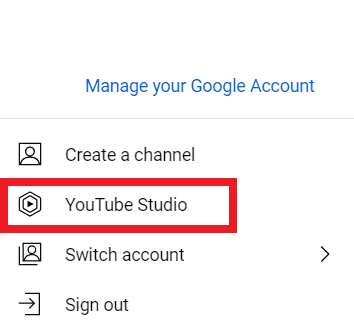
Step 1: Start by clicking your profile picture and selecting “YouTube Studio” from the drop menu.
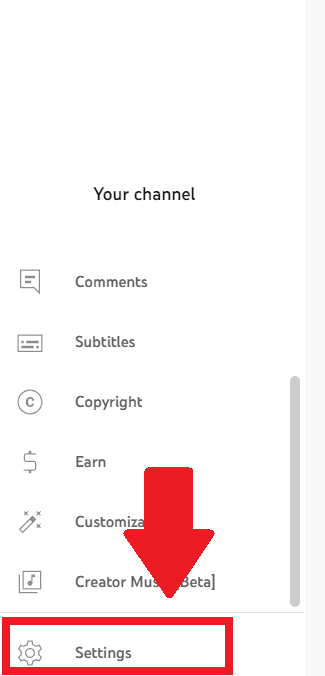
Step 2: Locate and click “Settings” in the left navigation bar.
Step 3: Click “Channel” from the left-hand menu, then hover over to the “Feature Eligibility” tab.
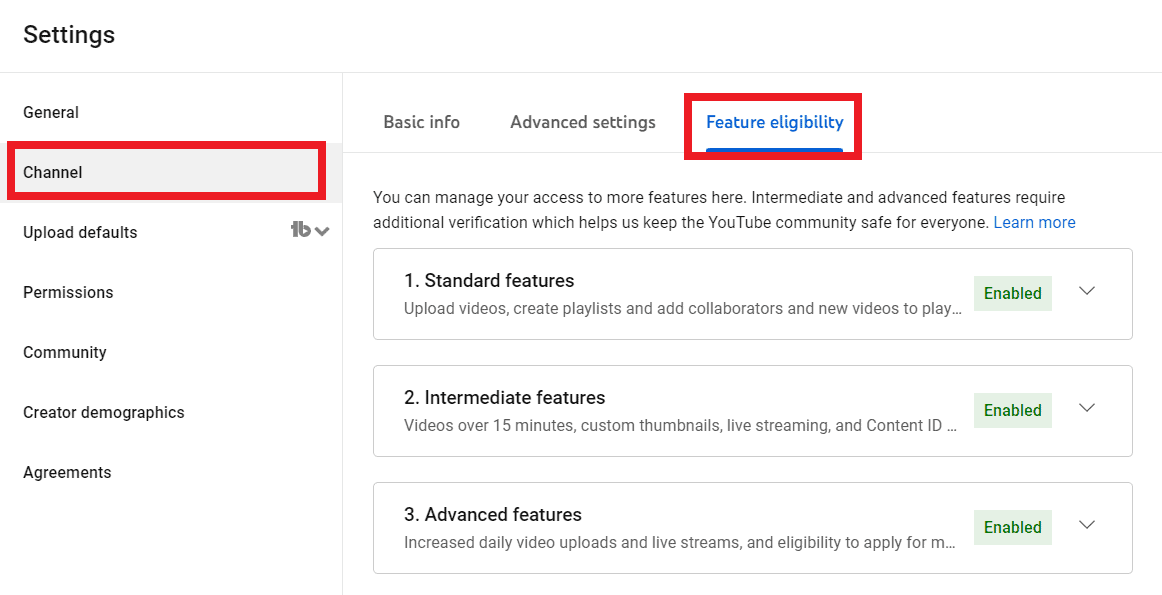
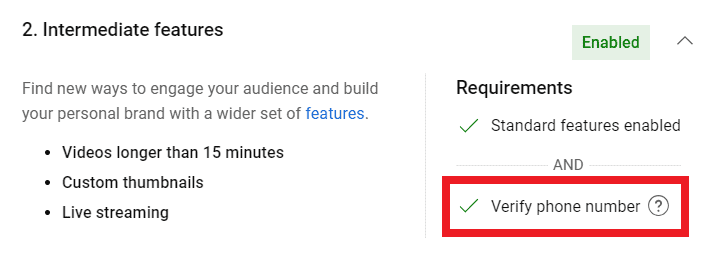
Step 4: Click on Intermediate features, then click the “Verify Phone Number” button and follow the prompts you get. Once done, you’ll get a green arrow next to ”Verify phone number”, as shown in the screenshot below:
Add “Basic Info” for your YouTube channel
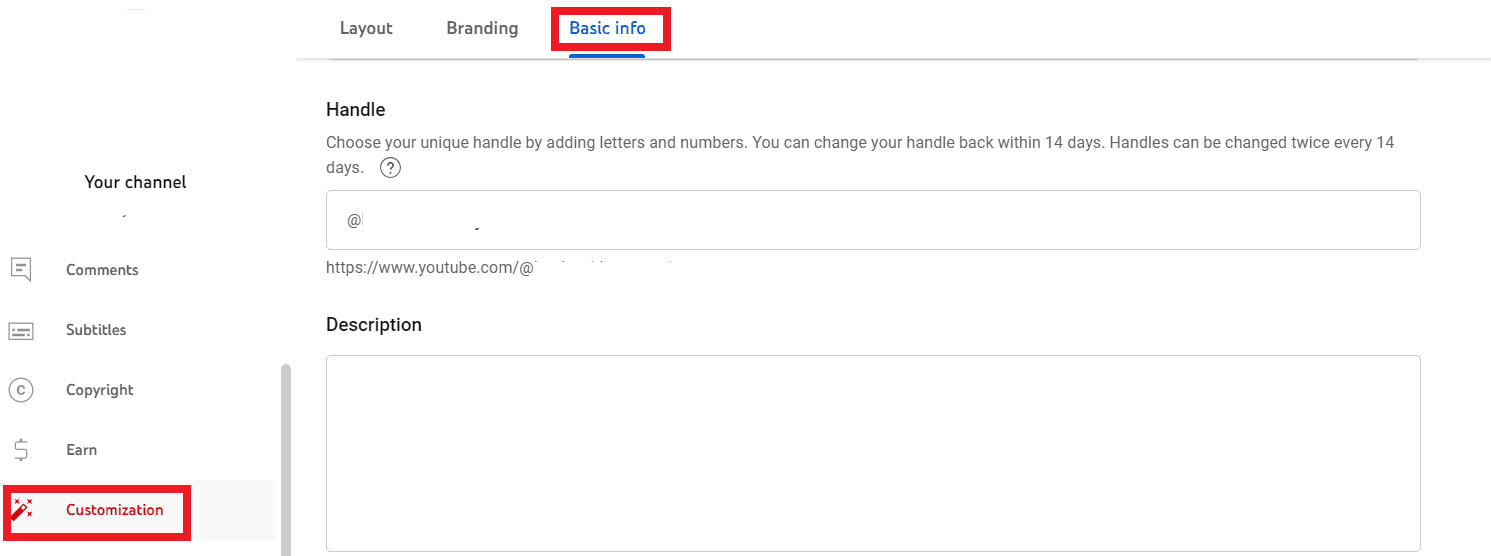
Navigate to the “Customization” option under YouTube Studio settings, and hover over to the “Basic Info” tab. Here you can add basic details such as your YouTube description, channel’s handle, contact information, and the channel URL.
Update your YouTube channel keywords
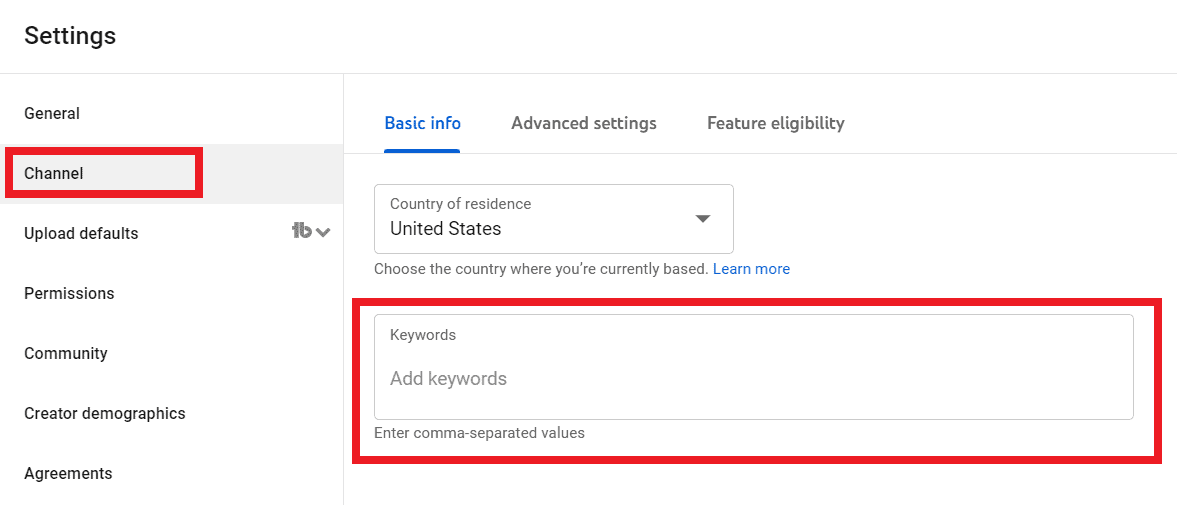
Inside the “Channel” option in your YouTube Studio settings left sidebar, you’ll see a space to fill in comma-separated keywords for your channel. Key a few broad themes about your channel here to help YouTube understand the topics you plan to upload videos about.
Brand Your YouTube Channel
YouTube provides a few elements to personalize your visual identity. Leveraging them to make your channel’s brand memorable for first-time viewers is important. Here are the specific features, along with where to find them:
Add a profile picture and banner image
YouTube recommends a square or round profile picture (at a size of 800 x 800 pixels) and a channel banner image (size of at least 2048 x 1152 pixels). In YouTube Studio, click “Channel Customization” in the left menu bar. Then hover over to the “Branding” tab to find options for uploading your picture and banner image.
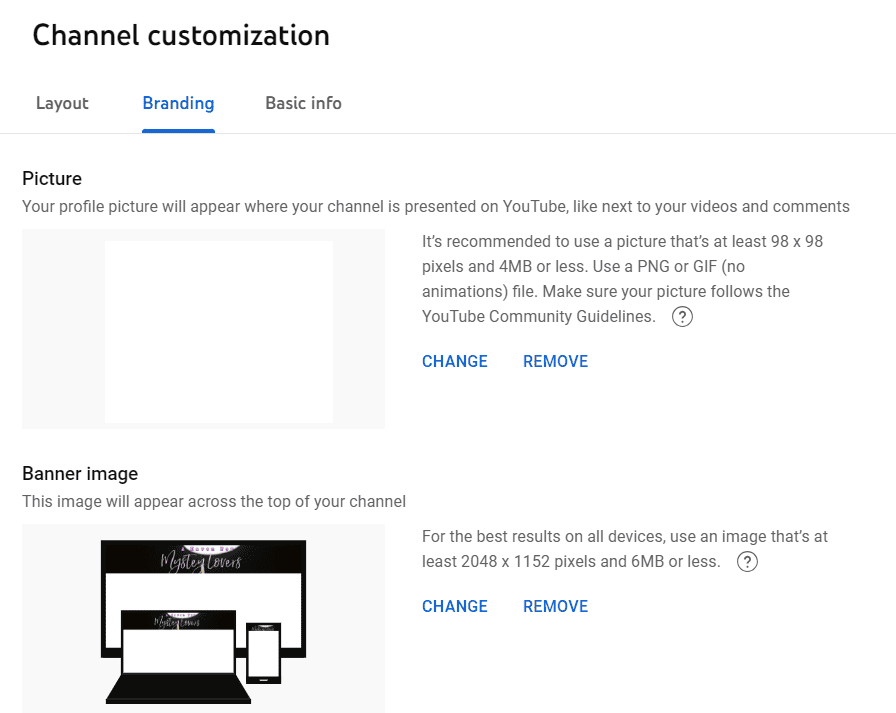
Here are YouTube’s tips on creating an engaging channel banner and profile picture.
Upload a video watermark
A video watermark is a small picture or logo that can appear in the bottom right-hand corner of your YouTube videos. As the example below demonstrates, it’s an opportunity to brand your channel with your photo, logo, or initials.
You can also put a “Subscribe” image of YouTube here. You’ll find the option to add the watermark under the Branding tab.
Channel art
Your channel banner gives your new channel visitors an immediate understanding of your channel. For example, Ali Abdaal’s banner below tells you he is a doctor, YouTuber, and podcaster. They also have simple icons that give hints about his channel’s content topics.

Channel trailer
A channel trailer is the first video a new viewer sees when they visit your YouTube channel. Some creators make specific channel trailers that are an overview of what viewers can expect from their content, while others will select one of their most popular videos as a channel trailer.
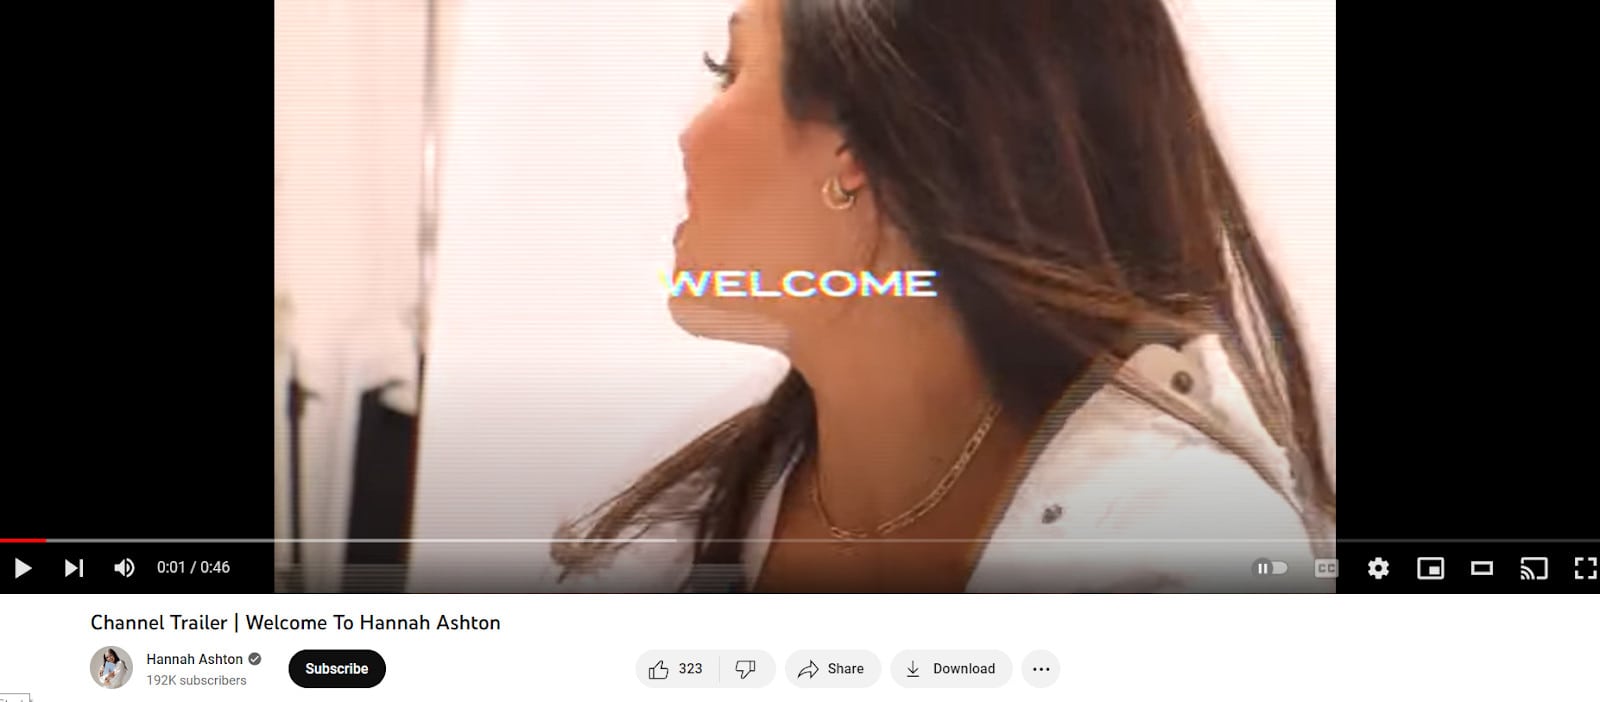
You may just upload a profile picture and channel banner at the beginning. Completing the above steps is much less important than planning content and consistently uploading videos on your channel.
2. Don’t Fret About Your Niche At The Beginning
When starting, feel free to post a wide variety of content across different topics without feeling pressured to “niche.” You can explore creating videos centered around your interests, passions, or career.
Doctor turned entrepreneur and successful YouTuber Ali Abdaal, shares:
“People always think they are a multi-faceted person, and I have all these different interests – can’t I just make a personality channel?…But, we want to be thinking more systematically about what is our niche, what is our target audience, and what are the things that I personally like and enjoy. What are the things I’m personally good at? Where are the areas I have an unfair advantage?”
In short, consider what you are better at than the average person. What unique experience do you have — whether in terms of a career, hobby, or life experience? Then, start posting videos in this area.
Just experiment and see how your audience responds to different video topics. If some of your videos resonate more with your audience or receive comments asking for more, you’ll better understand what direction to take your channel. You will also get a feel of the topics you enjoy creating videos around the most.
Layer — Not Niche
In one of her videos on starting a YouTube channel, Erin On Demand shares a sleek strategy she calls “Layer, not niche.” It allows you to share multiple passions and niches, aka “layers,” while keeping everything cohesive.
Erin uses herself as an example by sharing that her base layer is “entrepreneurship and social media tips,” followed by her second layer, “home life and marriage,” and her final layer is “health and wellness.”
Her second and third layers build on top of the entrepreneurship level by sharing home life, marriage, health, and wellness, through the lenses of a business owner, keeping everything ultimately related to her base layer.
Below is a snapshot of Erin on Demand’s content over several weeks demonstrating this strategy. She uploaded:
- a PODVLOG about staying creative and relaxing as an entrepreneur,
- a how-to video on her YouTube creation process,
- a video on social media tips,
- and another video on marketing trends.

All these videos rely on her base layer, “entrepreneurship and social media tips,” but are vastly different in the way they are presented as either how-to social media tips or lifestyle vlogs through the lenses of a business owner.
Whether you choose a highly specific or layered niche approach, don’t fret about it when you’re starting, as you’ll soon find what works for you and your audience.
3. Define Your Target Audience
YouTube creator and Marketing Strategist Adam Erhart explains, “Your target market is the people who are best aligned with what you are selling.”
Now, you may not feel that you are selling anything (at least not yet), but you are. Your YouTube channel is a business. You are selling your content. In return, viewers give you their time. Make it worth their while by aligning your content with what they want.
This may seem overwhelming initially, but define your target audience one step at a time. Consider these factors to determine your target audience:
Is your target audience a certain age? What are common factors that your audience may be experiencing based on where they are at in life?
Are you viewers living a particular lifestyle? They may be parents, young professionals, or someone interested in cooking quick and delicious meals. Pinpoint the kind of lifestyle your audience lives. It will allow you to relate to them and align your content to their needs, time, and budget.
Make your target audience as specific as possible. A general statement like “my viewers are into beauty” is vague. Define multiple demographics your audience falls into.
For example, “My audience is the average person in their 30s interested in quick and affordable makeup looks.” This statement shares information about your audience’s typical age, goals, and budget for makeup products, which helps you cater your content to them better.
Find Their Common Challenges
You can use your preferred search engines (or forums), like Google, Quora, Facebook Groups, and Reddit, to conduct further market research. What questions are people asking in your niche — specifically those in your current audience demographics?
Suppose your niche is fitness, and your analytics show that your audience is in their 40s. Your market research may find that many fitness-interested people in their 40s struggle with fitting time in to consistently work out while juggling kids, work, and other life necessities. What videos could you make to address this challenge?
Keep Revisiting Your Analytics
As you post more videos, look at your demographics on YouTube by going to your YouTube Studio, hovering over to the Analytics tab, and on to “Audience.” Here you’ll get a detailed look at your audience’s average age, gender, geography, etc., which will help you further understand your current audience.
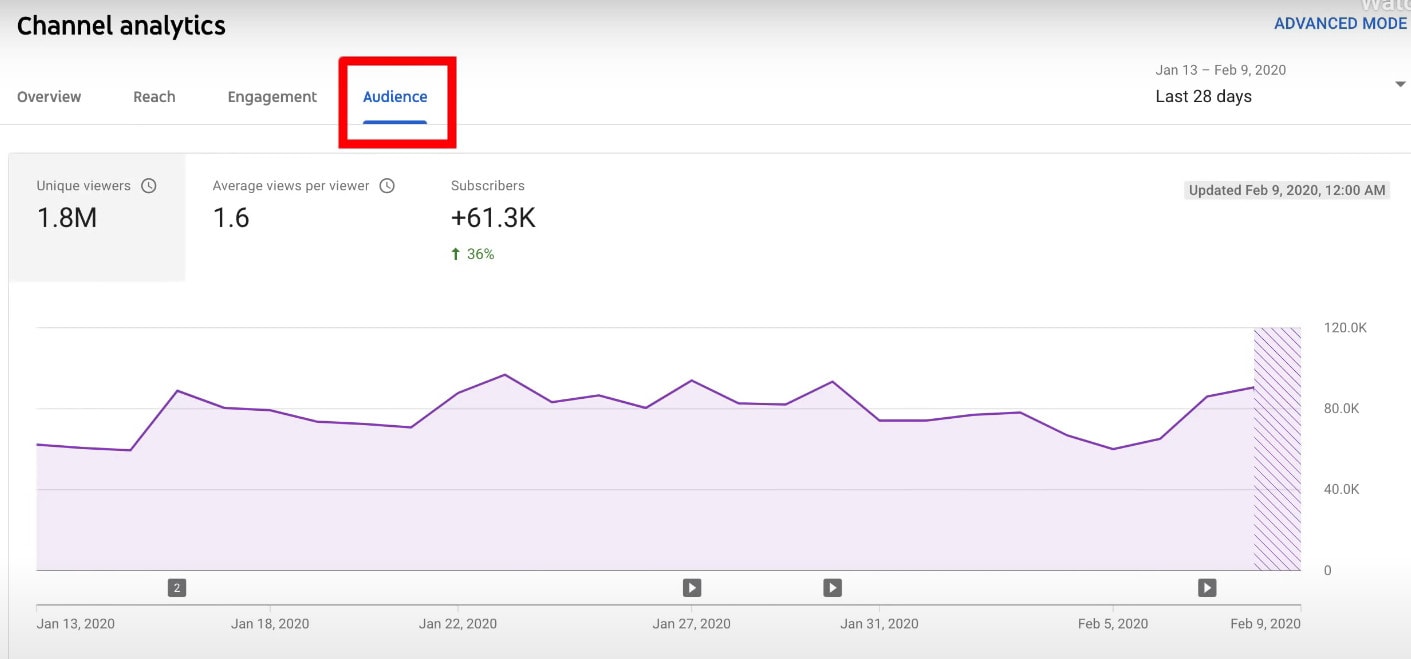
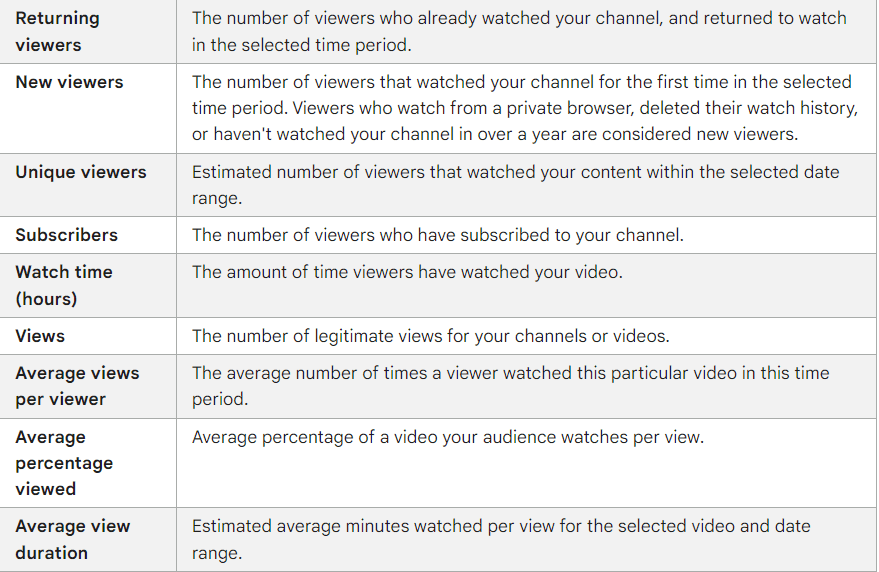
The more you learn about your audience and how they fit into your niche, the better you can design content that suits their needs — helping you become their go-to resource. Reference the following chart from YouTube Help to learn about each metric in your “Audience” tab.
4. Post Your First Video Before You Feel Ready
As a creator, I know posting your first video (or even the first ten videos) is terrifying. I recommend ripping the bandaid off and hitting “Upload” as soon as possible so you can get started.
I was SO apprehensive about posting when I shot my first few videos. I mustered the courage to post two general videos about books in my first month. It slowed my progress in becoming comfortable on camera. And in turn, the growth of my channel.
My Experience of Filming The First Few YouTube Videos
The below screenshot is from my very first BookTube video:
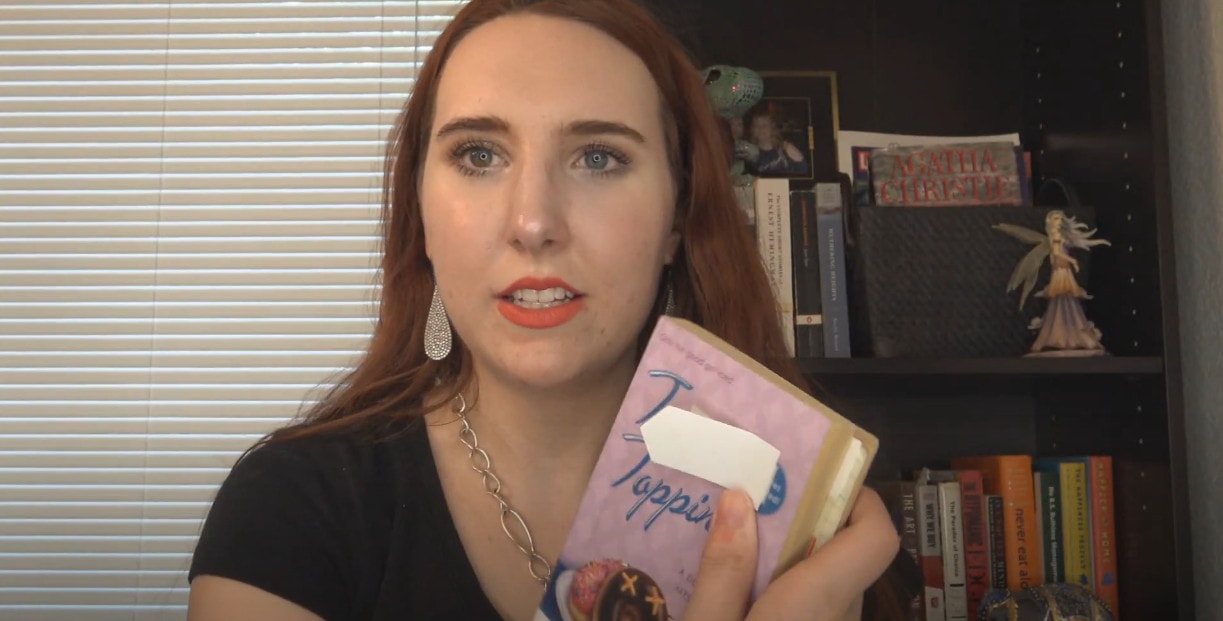
There are several things I wish I hadn’t done in the video:
- I look at the camera constantly during this video, so my eyes aren’t looking at the viewer
- The blinds in the back are an eyesore
- My body language is fidgety and uncomfortable.
Despite these mistakes, I’ve moved forward and wish, above all else, that I got over my initial apprehension faster.
What I Could Have Done Better at The Start of My YouTube Journey?
If I could go back, I would have filmed several videos and pushed them out in the first week. I could realize sooner that nothing terrible would happen, such as a bunch of negative comments or zero views. After posting several videos, I could relax on camera, knowing that my worst critic is myself, not anyone watching my content, and done is always better than perfect.
After overcoming this fear and publishing videos weekly, I’ve become very comfortable filming and posting videos and now have a tight-knit community of fellow book lovers.
Long story short – there’s a light at the end of the tunnel. Just get started and keep going. So many of your favorite creators wouldn’t be around if they didn’t overcome their initial fear.
To overcome your initial anxiety, you may consider creating short-form content. Start with publishing a few YouTube Shorts to get momentum.
5. Plan Your Content For The Next Month or Quarter
Planning can ensure you upload new videos regularly — which is important to your channel’s success at the beginning.
Going back to successful content creator Ali Abdaal’s advice on starting a YouTube channel: “…YouTube is a lifestyle choice. What you’re signing up for — If you’re taking this seriously — is making videos every week for the next several years of your life.”
Now Abdaal does mention creating about three videos to get a feel of the process and see if you enjoy it. Once you make up your mind, below are three ways to generate video ideas and start building an inventory of topics for filming.
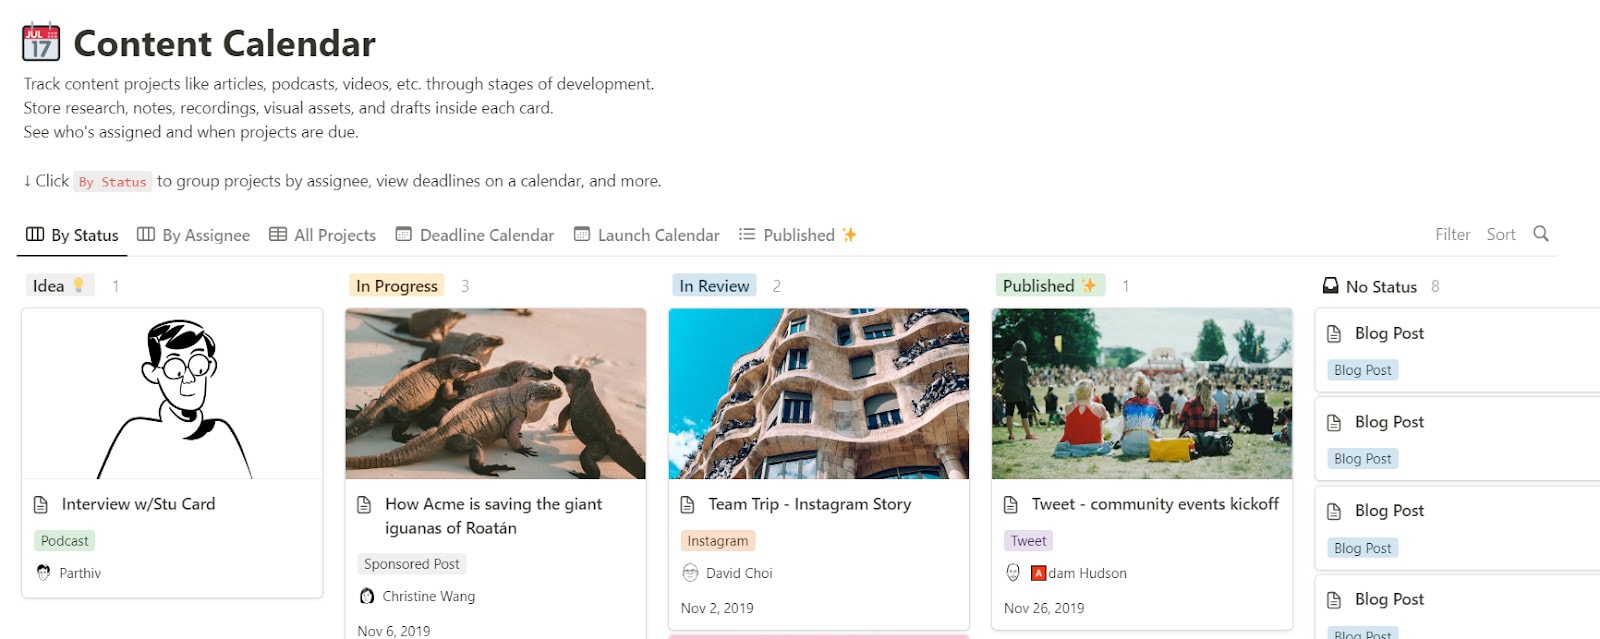
You can use good old pen and paper to note down the ideas you generate. Or go the digital route, using a project management tool like Asana or Notion. Here’s a content calendar template for creators, where you can add new subjects to its “Ideas” column.
Rely on Your Expertise
Do you have a unique profession requiring specialized training (i.e., a doctor, lawyer, etc.)? Or have you developed a set of skills for your day job? Then you can lean on them to brainstorm video ideas.
Think how you would explain the subject you specialize in, to the amateur version of you a few years ago. You can also get some cool ideas by plugging a few topics from your channel’s theme in an AI course outline generator like LearningStudioAI.
Perform Competition Research
I subscribe to a huge number of bookish content creators because I not only enjoy the content — but am constantly inspired by what other creators put out. I also take note of audience feedback on their videos to take inspiration for my video ideas.
Similarly, I recommend you explore the popular videos in your niche. Subscribe to various creators, and keep an eye on videos performing well from top niche creators and those from smaller channels that are picked by the YouTube algorithm.
It’s crucial to not only recognize videos taking off but to gain context on why they are performing well. Here are some questions you can try to answer for analyzing popular videos:
- What types of videos are taking off? Are they listicles, trends, vlogs, or some other specific template?
- Do they have a similar subtopic, unique editing, filming style, etc.?
- Are the topics seasonal or related to a specific event leading to the popularity of videos?
- Did the creator present the information uniquely and engagingly?
- Was the video’s title or thumbnail especially eye-catching?
Analyzing such intricacies can ensure you don’t add ideas that performed well because of an exceptional condition, such as seasonality or a peculiar trait of the creator (do they use pyrotechnics to engage the viewer?). You can add those ideas to your archive that you feel confident about.
Use Keyword Research Tools
TubeBuddy and vidIQ are fantastic YouTube keyword research tools. They can help you identify less competitive topics that get you evergreen traffic from YouTube searches.
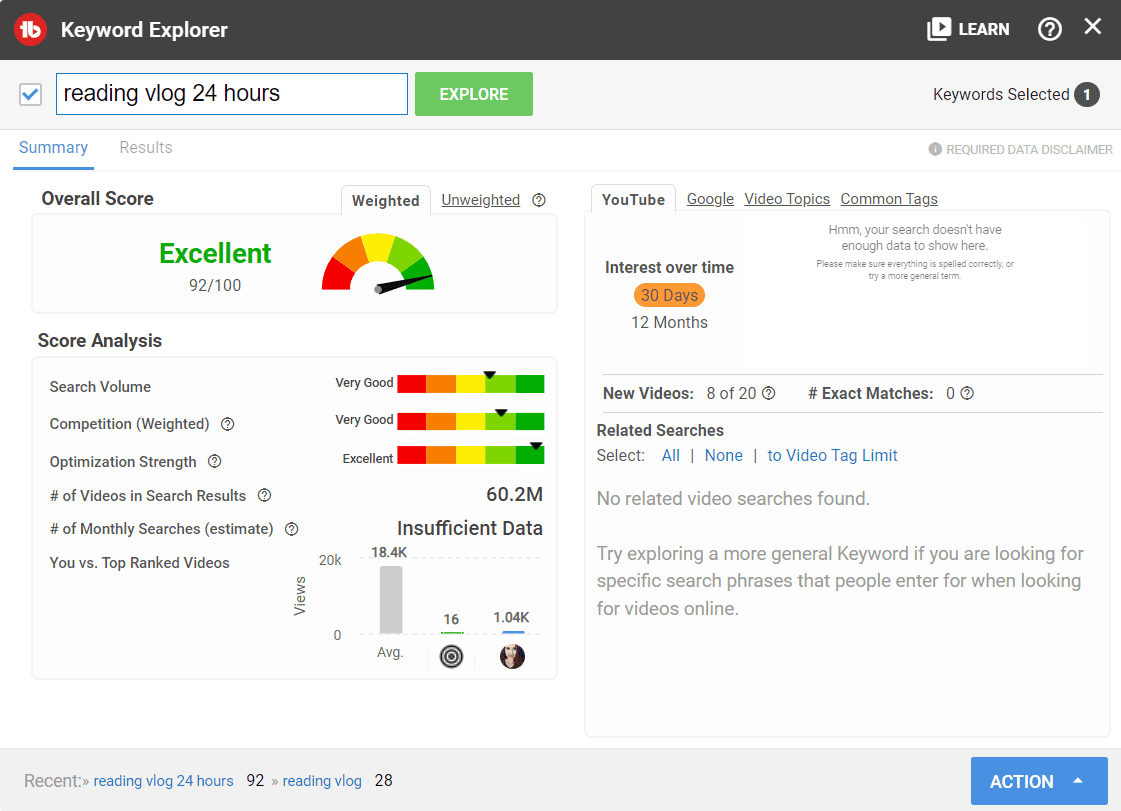
The following picture shows TubeBuddy keyword research on “reading vlog 24 hours.” This is a keyword I would personally use because it has an excellent rating combined with a high search volume and optimization strength. These details from TubeBuddy show that I have a strong chance of ranking for this in search results, allowing more viewers to find my channel.
Here are dedicated reviews of vidIQ and Tubebuddy to learn more about their features for finding relevant video ideas.
You want a list of topics for a month or quarter by using the above three techniques.
6. Build a Simple YouTube Workflow That Works For You
Many successful YouTube creators started out filming on whatever was accessible to them. In her “Starter Kit for New YouTubers 2023” video, digital entrepreneur Katie Steckly shares, “It really is possible to get started with just your phone.” So you don’t need to spend lavishly on an expensive camera, lighting system, editing software, or backdrop.
But you need to build a sustainable workflow because becoming a YouTube creator is a lifestyle choice. You need to create videos consistently and for a long time — so make the process enjoyable. I recommend establishing a monthly and weekly workflow routine.
How I Streamline My YouTube Channel’s Planning Using Asana and a Paper Planner
My monthly routine is creating a content calendar at least one month in advance in Asana. It contains a basic outline of my video ideas, titles, and when I plan to upload them.
Then I sit down every Sunday with my paper planner, Asana outlines, and TubeBuddy to finalize my video ideas. I also write down what I need to complete for videos going up the same week. It can include tasks such as filming the B-roll and editing. I’ll also record in my planner the videos to film the next week and schedule a date for the same.
The above setup keeps me from scrambling at the last minute to brainstorm ideas, film, edit, and post videos on the same day.
Here’s a snapshot of my workflow in Asana:
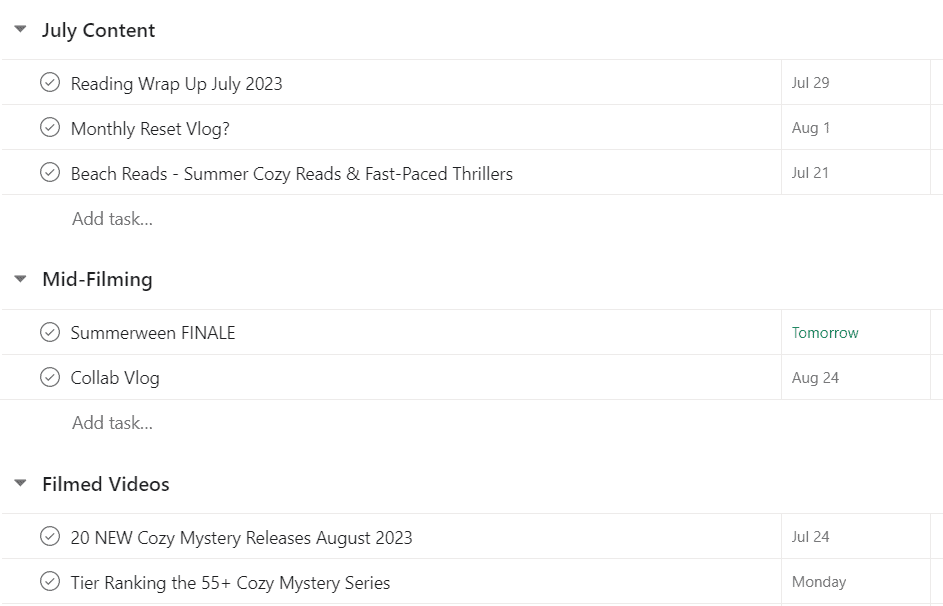
Here’s a breakdown of the labels above:
- July Content: My planned content for the month with upload dates. It’s a list of videos for the current month that I haven’t filmed yet, and need to plan filming dates for in my weekly schedule.
- Mid-Filming: This indicates videos I’ve partly filmed, and usually contain multi-day vlogs. Or videos with a lot of B-roll that require more than one day to film.
- Filmed Videos: Videos that I’ve filmed but need to edit and upload to YouTube. I check off a video only when it’s scheduled and uploaded with a complete description, thumbnail, and the like.
On a monthly basis, I fill in these categories and plan due dates, and they also inform my weekly workflow by informing me what I need to film, edit, and finalize.
I recommend experimenting with different schedules and workflows to see what works best for you. Consider if you want to batch filming videos every Tuesday, and edit them on Wednesday and Thursday. Or would you prefer to film and work on one video at a time?
7. Commit to a Consistent Publishing Schedule
There are a lot of reasons we tell you to upload more videos. But successful YouTuber expert Nick Nimmin hits the bull’s eye in one of his videos:
“…The more you upload — as long as you are paying attention to what you are doing — the better you are going to get at making videos that people enjoy. By uploading more, you’re going to stack your skills up all the time.”
And Nick isn’t just being philosophical. His advice is based on data from 3.5 million YouTube channels. It may take multiple thousands of videos to stack up millions of subscribers.
But more than creating a certain number of videos, it’s essential for you to stay consistent. Commit to a specific publishing schedule — whatever seems sustainable for you.
I prioritize posting two videos a week. I like the flexibility of not having specific upload days because it takes a little pressure off me if I am a day behind schedule. But it helps me stay consistent by prompting me to publish fresh, weekly content on my channel.
Many creators also benefit from external accountability when they know their viewers anticipate two new videos a week. Or a video posted at a certain time of day. You won’t want to disappoint your audience, would ya?
For consistency’s sake, try mixing up the type of videos you create. If you plan to upload twice a week:
- Plan for one video to be a simpler sit-down video,
- And your other video may be more time-consuming, like a vlog or a how-to tutorial.
I also recommend having a backup video already filmed should life happen. Or if a video doesn’t turn out right.
8. Get Your YouTube Titles Right and Up Thumbnails Game
You could make the most engaging YouTube videos, but what if no one clicks through them on YouTube? That’s why you need a compelling title and clickworthy thumbnails. When a prospective viewer scrolls YouTube, they act as an advertisement for your video across hundreds of other choices.
David King from the Tubebuddy content team shares the following three tips for creating a clickable, engaging thumbnail:
- The squint test. The thumbnail depicts the video idea clearly, even if you are squinting while looking at it.
- Simplicity. Too many elements can distract and make identifying what is in the thumbnail challenging. Color blocking is a great way to distinguish different elements of your thumbnail so that viewers can quickly take in information from it.
- Emotional pull. Some creators use over-the-top, dramatic expressions in their thumbnails, while others use more subtle emotions. Either way, your thumbnail must ideally incite an emotional reaction, such as fear, excitement, shock, or anger, to inspire the click.
Oh, and most of the YouTube audience will watch your videos on mobile phones — where thumbnails are tiny. Canva is a great tool for designing your thumbnails, and you want to stay consistent with your channel’s chosen brand colors.
But you can also utilize YouTube’s newly launched feature, “Test & Compare”, to A/B test thumbnail and find the one getting more click-throughs.
Don’t Forget Your Video Intros
Remember that many viewers may browse your videos through the YouTube autoplay or inline video preview features. It makes your static thumbnail “irrelevant,” as MrBeast said. And the best way to put your video in the best position to get clicked?
As per MrBeast, you can make the first five seconds look like a thumbnail, “…the first five seconds goes with the thumbnail.”
9. Learn About The YouTube Algorithm and How to Grow a Channel
To keep up with the changing YouTube algorithm and find time-tested advice on growing a channel, you need to keep educating and leveling up your skillsets.
I recommend following YouTube education channels like Think Media, educational blogs, the official YouTube blog, and some of your favorite YouTube creators.
Also, check and analyze your YouTube analytics regularly. Learn its basics and the discovery and performance systems on YouTube. Then use the information to find insights on optimizing and growing your YouTube channel.
But beware of not making such education become an excuse for perfectionism. I occasionally experience analysis paralysis, spending a LOT of time with analytics instead of creating content.
One of the timeless tactics to grow your channel is improving your watch time. Once analytics data tells you what kind of content and style engages your audience — just try to do more of it consistently.
10. Forget More Views and Subscribers. Instead, Your Goal Should Be This…
“The grind is real, and it’s really important. What we’re talking about is when the grind is nonstop, and it’s a way of life, and there’s never any light at the end of the tunnel where you can turn it off and be done. What we really want you to understand is that loving the grind will grind you into the ground. You’ll stop producing content.”
Those are words of wisdom by YouTube expert Tim Schmoyer from Video Creators. Sure you may want to hit the 100,000 or one million subscribers milestone. But you need to create videos for an extended period to get there. You’ve got to try first to make a sustainable YouTube based business.
Matt Koval, a former YouTube content strategist, highlights that the average creator lifecycle lasts barely 5-7 years. And that, too, is for those creators that made it.
As per Matt in one of his following videos, one way to future-proof your creator career is to think like an entrepreneur instead of an entertainer. Instead of trying to become a YouTube influencer who gets millions of views and subscribers — prioritize creating an email list and selling your products and services.
A sustainable creator business built on top of YouTube will not only have a long shelf life — it’s also more fun to make money while making videos.
Starting a YouTube Channel is Simple (If You Keep It That Way!)
Starting and maintaining a YouTube Channel is all about consistently improving your skillsets, including scripting, video editing, filming, research, camera presence, marketing, and the like. You need to get started and just keep creating. So now that you know everything to become a successful YouTuber, it’s time to make your first YouTube video.
