You are done with the hardest part. You chose a niche market, handpicked the type of podcast, found the right-vibe royalty-free music, and ultimately created your very own podcast. The next step is to submit your podcast to iTunes, America’s favorite podcast platform. 32.3% of people from all over the globe download podcasts from Apple Podcasts on a monthly basis. Undoubtedly, iTunes is the best way to ensure that you reach as many listeners as possible.
But how do you even start a podcast on Apple Podcasts? Is iTunes a hosting platform?
That is a fairly common misconception. Apple Podcasts, Spotify, and the like are podcast directories, they don’t actually host your podcasts, they rather give your podcast a space to be listened to by your audience. Buzzsprout and Podomatic, on the other hand are some of the free podcast hosting platforms that enable listeners and iTunes to get a hold of your podcast easily by showing where your podcast files are located.
So, you don’t upload episode by episode on to iTunes but something much easier than that. Let me guide you step-by-step on how to publish your podcast on to iTunes:
1. Upload Your Podcast Episode On iTunes
You can upload your podcast episode in the form of a .mp3 file with your podcast host. I highly recommend using Buzzsprout for this if you like things simple and especially if you are a beginner. The platform is user-friendly, contains useful statistics, and includes a built-in website.
If you are interested in reading more about Buzzsprout, read our review and walkthrough of it here.
Click on “Upload a new episode” once you’ve created an account.

2. Fill In Podcast Details And Show Notes
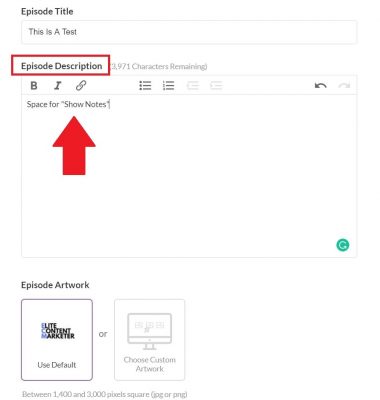
You can set your podcast episode’s title, description, custom artwork (or logo) at this stage once your file is uploaded. Ensure that your podcast meets the requirements set by iTunes at this stage, having the following: Apple ID, Title, Description, Artwork (minimum 1400 x 1400 pixels, maximum 3000 x 3000 pixels), Language, and Category. Most podcast hosts ensure that they have all this information on hand in advance.
This is also the place where you submit the ‘show notes’ – the links/resources mentioned in the podcast episode, a short summary of your discussion, and possibly a transcript of the show. The show notes are not mandatory but they are highly recommended when you publish your podcast.
If you’re using Buzzsprout, “Episode Description” is the area under which you put in your show notes.

3. Find Your RSS Feed
You only do this step once you have completed publishing your first episode.
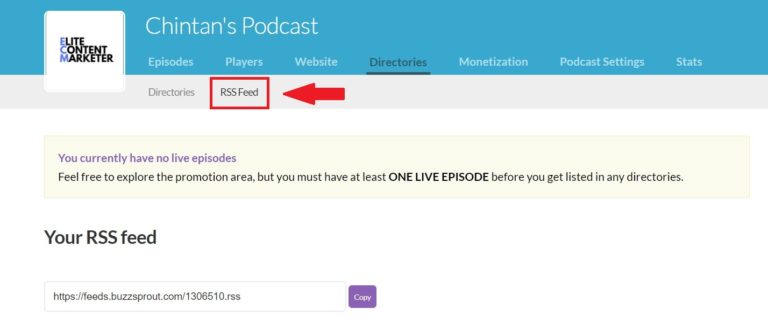
All you have to do is find the RSS feed address that your host has provided. If you can’t find it, the host will surely have a Help Center or Customer Service to help you out with the same.
In Buzzsprout, you can find the RSS feed in Directories > RSS Feed.

4. Submit Your RSS Feed To Podcast Connect
Podcast Connect is Apple’s podcast management space. You can log in through your Apple ID and click on the “+” button to create a new podcast feed. Paste your RSS Feed on the space provided and click “Validate.”
If all information provided is correct, you will see a green light and the status heading displaying “Prepared for Submission.” At this stage, you can do a quick run-through of your podcast title, artwork, description, and other information just to ensure a final check.
Click on Submit and wait for confirmation of your submission. This can take anywhere between a few hours to a few weeks. Meanwhile, you can check your iTunes podcast submission status through your Podcast Connect account.
In the interim, submit your podcast to other directories like Spotify, GooglePlayMusic, TuneIn, etc. for wider distribution.
After Apple approves your podcast to be published on iTunes, your feed will be automatically updated as you keep uploading new episodes from your hosting platform.
Voila! You’re done. Congratulations.
